orage version 4.7.5.
Last updated: March 2010
Copyright © 2006-2010 Juha Kautto
Table of Contents
Orage is a time-managing application of the Xfce 4 Desktop Environment . It includes a calendar window, list of events and day view. Orage has several kinds of alarms and is ical compatible so that you can transfer appointments from other calendar systems into Orage or vica versa. It also provides an easy way to archive and manage your old appointments.
Orage is started by typing orage on the command line or in the run
application window. The command line accepts some options like -v, which
tells the version and -h, which shows short usage help. You can also start
orage by clicking on the item orage in the submenu "Office" from the
desktop menu. Another handy way of starting orage is to click button 1 on
orageclock panel plugin. But usually orage is started automatically as
part of Xfce startup.
The first thing you should do is to adjust your preferences. Before adding any appointments, it is strongly recommended to set your local timezone.

When you run orage, you will first see the calendar window appearing.
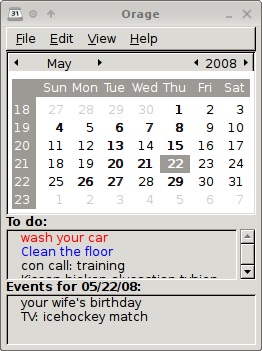
The calendar window provides you a menu bar giving access to different functions. Below that is a standard calendar showing the month, the year, day names and week numbers. At the bottom there is small window showing active TODOs and EVENTs on the selected day.
The menubar contains four menus: File, Edit, View and Help.

The file menu contains four items:
- New: start an appointment window for creating a new appointment;
-
Exchange data: creates window where you can do file level operations
to
oragedata. (1) import and export appointments betweenorageand operating system files or 2) renameoragefiles or 3) add and remove foreign calendar files.); -
Close: hide the calendar window but keep
oragerunning in the background; -
Quit: end
orage;

The Edit menu gives you access to the settings window, which will be explained later.

The View menu has three choices:
- View selected date: show the event list of currently selected date;
- View selected week: show the day window starting from current day;
- Select today: set calendar's selected day to be today;

Calendar view presents you one month, which you can change by pressing the arrow beside the month name or the year number or using the mouse wheel. Days where you have appointments or where you have Ending TODO are marked as bold. One day is always selected and shown with a block. You can change the selected day by single clicking any day number. Double clicking a day number causes event list window for that day to be activated (or day list if you changed your preferences).
The bottom window lists your active TODOs. You can scroll to see them all. Red means the TODO is late (due date has passed). Blue means that the TODO is active (start time has passed, but you still have time before the due time passes). And black means a future TODO. You can edit TODOs by double clicking the row. All rows have tooltips, which show more details about the TODO.

The event list (or appointment list as it is also called) window shows all activites that you have reserved for the day (date is shown in the window heading in your locale format). On top of the window you have menu and buttons to do actions. This is your main activity window and you may want to keep it up all the day and even make it to appear on all workspaces or to be always on top of other windows.
There are ten activity buttons in the button bar from left to right:
- New: start an appointment window for creating a new appointment for this day;
- Duplicate: also start an appointment window for creating a new appointment for this day. But do not start from scratch, but copy all values from the active row in the appointment list below. Note that if you do not have any rows selected from the event list, this button does not do anything (but gives a warning);
- Delete: remove all selected appointments. There is no undo, so be carefull with this button! Before removing anything Orage asks for your verification.
- Back: show previous day;
- Today: show today;
- Forward: show next day;
- Refresh: redisplay this date;
- Find: activate the search tab;
- Close: close this window;
- Dayview: start day list window;
Each of the four tabs selects the type of appointments to show. There may also be extra selections possible depending on the tab. You can select tab by clicking it or by using the mouse wheel. Let's check each tab:
- Event: the event tab shows all EVENT type appointments happening on this day. It is possible to see more than one day in this tab by setting "Extra days to show" number to larger than 0. (You can change the default 0 in the preferences dialog.) Each number shows one more day. (It causes the Time column in the event listing to show also the date.)
- Todo: shows your active TODOs similarly than in the main calendar window. Only active ones are shown. If you want to see old TODOs, you need to find them in Search tab.
- Journal: lists your notebook entries starting from certain date. Default start date is one year back and you can not change the default setting.
- Search: enter a free text, which is searched from all the appointments. Usually the search is case independent, but for some utf8 characters Orage switches to case sensitive search method. This happens if the length of the string is different in upper case compared to lower case (for example German language double s causes this).
The list shows all appointments satisfying the conditions and tab type. Scrollbars will appear if there are more lines or longer lines than what fits into the window. You can edit any appointment by double clicking the row. Each line has three fields:
- Time: the starting and ending times of the appointment (the format varies depending on tab and appointment). All times are always shown in your local timezone. It is possible to define special whole day appointments and they have a text "All day" instead of real start and end times. Rows appear in start time order. +sign in front of the time means that the appointment started on some previous day and correspondingly +sign at the end of the time means that appointment continues and ends later than the selected day. If the Event tab shows today, there are few extra formattings used: When the event has passed, it is overstriked. Currently active events are shown with blue colour and future events are bold.
-
Flags: gives information about the appointment. If your appointment
has a category which has been associated with a clour, flags field has
that colour background. (Note that the explanations are visible as
a hint when you move your cursor into the appointment list.)
There are five flags in order:
- Alarm: what kind of action happens when alarm time passes. n means no alarm has been defined. A means that visible window is raised. S means that sound is played. (If both visual and sound alarm is defined, S is shown)
- Recurrence: how often is that appointment happening. n means no repeating so that this event only happens once. D means daily repeat, W weekly, M monthly and Y yearly.
-
Type: what kind of reservation is this. Two options:
f means free so that the action is not reserving
the time and it is possible to schedule more appointments at the
same time and respectively
B means busy, so that
nothing else can be done at this time. Note that current
version of
oragedoes not enforce these and the flag is only as a comment (in the future this may be enforced). - File: where this appointment is stored. O means it is in the standard active Orage file, A in the archive file. (The appointment is automatically unarchived if it is edited.). Archived appointments can only be found in the Search and Journal tabs. F appointment is in foreign file; in other words it is not native Orage appointment.
- Appointment type: E for EVENT, T for TODO and J for JOURNAL. This flag is usefull only in search tab since the tab name informs the type in other tabs.
- Title: the heading of the appointment. Note that the whole title is shown, so you may want to avoid using too long titles to keep the view cleaner.

The day list window shows all events that you have reserved for the next days. Default is to show 7 days, but you can change that and see up to 40 days at once. On top of the window you have menu and buttons to do actions. This is another form of your main activity window and more usefull than event list window if you want to find room for your new events or see your agenda and free time from longer perod than one day.
There are six activity buttons in the button bar from left to right:
- New: start an appointment window for creating a new appointment for this day;
- Back: start listing one day earlier;
- Today: change start day to be today;
- Forward: start listing one day later;
- Refresh: redisplay the window;
- Close: close this window;
Below the buttonbar are the two settings. You can change the start day of the day list and the number of days shown.
Biggest part of the window is the day list area. You can click the header of the day to open event list window for that day. First line contains full day events when defined. The other lines contain events that you have scheduled. Each event has tooltip which include appointment details. You can update the event by double clicking it. Events are placed on the start time row and even if the length is several hours, the event is only visible on single row. If the event is taking time (availability=Busy), there is vertical line in front of it showing its length. These lines show how full your calendar is and makes it easier to find free time quickly. If more than one event starts at the same hour, they all are added to the same row / column after each other and the reservation line is the overlap of them.
The appointment window is used to add, edit and delete appointments.
It is the most complex window in orage, but most fields still have good
default values and are not mandatory. It has button bar (All actions are
also available in menus above the buttons) and three tabs controlling
basic settings and alarms and recurrence settings.
There are 5 activity buttons in the button bar from left to right:
- Save: store the appointment to the orage system. This causes also data validity checking.
- Save and close: like Save, but also closes the window.
- Revert: undo all changes done after previous save. Note that this button is active only after data has been changed.
- Duplicate: start creating new appointment and copy all values from the current activity into it. The new appointment is not created until you press .
- Delete: remove current appointment permanently from orage system.

In this tab, you define the contents of the appointment.
- Type
Orage can handle three types of appointments:
- Event is something that happens sometimes. It has start and end time. This is the most common appointment type and you actually can handle all cases with this, since it also is the most flexible type. So if you are not sure what type to choose, Event is your best bet. Events either reserve your time (Availability=Busy) or are free which means this event does not take time from your schedule.
- Todo is some action that you need to complete. It usually has a start time and due time when it has to be finished. It has no end time, which is replaced by the due time. You can also use duration similarly than with events. Todos have no availability, but instead they have completed time. After you set the completed time, the todo is done and is removed from lists visible in main calendar and in todo appointment tab.
- Journals are just notes. They do not have end times nor availability. It is not possible to add alarm or recurrency for journals.
- Title
The title of the appointment. It appears in the event list and also in the alarm window and is listed at the header of this window. It should be a rather short summary of the appointment.
- Location (Event and Todo)
This field should describe where the event happens. It can be for example Home or Office or Paris depending on what kind of appointment you have. It is also possible to leave it empty.
orageis not using it in any special way, nor is it visible anywhere else than here. Journals do not have location.- All day event
Selecting this checkbox causes so called whole day appointment to be defined. These do not have start nor end time defined, but it is possible that the event lasts several days. Start time is assumed to be the beginning of the day at 00:00 and end date at the last day at 24:00.
- Start
Defines the start time of the appointment. First, press the date button and choose the date from the calendar. After that you set the hour and minute using either your mouse wheel or clicking the small arrows. It is also possible to type the numbers directly to the fields. Hours go from 0 to 23 (24 is not allowed value).
The last button is timezone. Default value for new appointments is your current timezone, which you have set in the preferences. It is recommended to use real timezones instead of floating. You should not mix floating with real timezones although it is possible. Floating means that time is not bound to any timezone, but varies according to current settings. Modifying either the default timezone or start timezone may cause floating values to change.
- End (Event)
Similar to Start, but defines naturally the ending time. Note that start and end timezones may be different (for example when you schedule a meeting in abroad you can set the starting time in your local timezone and the rest of the timings in the destination timezone). Event list window always shows times in your local time. Only events have end time.
- Due (Todo)
Similar to End, but defines the time where the todo should be completed. Only todos have due time.
- Duration (Event and Todo)
Often it is easier to set the appointment duration instead of ending (or due) time. You can do that by marking the first box here. It is not possible to have both end/due time and duration at the same time, so end/due time setting will be unavailable after you select duration. Maximum duration is 1000 days, which is almost three years. Note that although the minute selection jumps 5 minutes at a time, you can manually enter any number.
- Availability (Event)
What kind of reservation is this. There are two possiblities: Free means that the action is not reserving the time and it is possible to schedule more appointments at the same time and respectively Busy means that nothing else can not be done at this time. Note that current version of
oragedoes not enforce these menings and the flag is only as a comment (in the future this may be checked).- Completed (Todo)
By selecting the Done box you mark this todo as done. The completed time can then be set. Format is similar to other times (like Start). Only todos have completed time.
- Categories
Free format text, which you can use to categorize your appointment. It is also possible to create a list of categories and associate those to colours. You can then pick one of those and get your appointment to be shown with that colour in the event list window.
- Priority
Priority of the appointment.
orageis not using this, so treat it just like a comment.- Note
Free format text, where you can and should explain more the appointment. It is shown in the alarm window. Scrollbars appear when needed.

In this tab, you define the alarm for the appointment. orage supports
three kinds of alarms: window, sound and procedure, but they all happen
at the same time. It is possible to define only one alarm time for each
appointment. To cause an alarm you need to do two things: You have to
define alarm time and select alarm type. By default alarm happens 5
minutes before the appointment start time. Default alarm is Orage
window without sound.
Alarm time is set if any of the alarm timing numbers is non zero (in other words there is no special flag to set alarm; just define the time for it. This also prevents setting alarm to happen exactly at the appointment start/end time). You need explicitely select each alarm type by crossing the Use box. If you do not choose any alarm types, the alarm does not happen.
- Alarm time
Define how much earlier or later the alarm happens. If all numbers are zero, no alarm is raised for this appointment. The last field defines what these alarm offset numbers mean. You can define alarm to happen based on start or end time of the appointment and also if it happens after or before the time. Default is to alarm before the start time of the appointment. But specially for todos it is often more usefull to raise alarm before the due (=end) time.
- Persistent alarm
When
orageis not running (for example if your computer is shutdown) alarms can't happen. If you want to get reminders afteroragestarts again, you need to set the alarm as persistent. By default alarms are just lost.- Sound
Define the sound file to be played when the alarm fires. Leaving this empty disables sound alarm. Remember to define the actual play command in the preferences dialog. You should also test that your system can play the filetype you choose there. Simply start a terminal and test it using the command you specified and the sound file.
By default alarm sound is played only once, but you can make it repeated by choosing the box next line. You can also define how many time it is repeated and what is the interval. Be carefull to set the interval longer than the length of the sound since
oragedoes not wait for the previous sound to end before starting the next sound after the interval. Note that there is a silence button in visual alarms, so that you can stop the noise, but that only prevents the next play to happen, it does not interrupt currently playing alarm, which you should remember when using long lasting soundfiles.- Visual
oragecan show two kinds of internal visual alarms. Orage window is a small alarm window showing the heading and note text. Notification is more fancy notification using libnotify. You need to have libnotify installed before you can define notification kind of visual alarm. orage -v shows if you have libnotify support included.- Procedure
This makes it possible to use external alarms. You can run any operating system command or script. Common use for this is sending email.
- Execute
You can test your alarm by pressing this. It raises the alarms immediately so that you can listen the sounds and see the windows.
- Default alarm
You can either set alarm back to default options or you can store current settings to be default alarm for all new appointments. There is only one default alarm, which applies to all appointments.

In this tab you can define repeating appointments. Often it makes
sense that the same appointment happens every day or every month instead
of creating a new appointment for each event. Note that orage does not
support exclusion day ranges (like you would like to skip holiday period
from you work related appointments), so you have to end the whole
recurrency and enable it again after it need to resume. orage also
misses the possibility to modify only one specific event from a
recurring set. All changes affect the whole set of appointments.
- Complexity
Default is Basic and that makes it possible to define frequency and limit of the appointment only. Often that is enough and these settings are very easy and fast to do even if you are not familiar with calendars and alarms. Selecting Advanced gives you more possibilities and makes it possible to build complex recurrent appointments like for example:
- Every Monday, Tuesday, Wednesday, Thursday and Friday.
- Last Tuesday on every second month.
- Frequency
This is the base repeating period. Default is no repeat (=None) and other possibilities are daily, weekly, monthly and yearly.
The next selection makes it possible to easily skip some periods. Default value is 1 and it means every time as specified in the Frequency selection. 2 means every second time and 3 every third time etc. For example if you want to schedule your meeting to happen every third week, select Frequency = Weekly and set Interval to 3. (Starting time is selected in the General tab and next event happens exactly 3 weeks from that)
- Limit
orageallows you also to limit the repeating count:- Repeat forever: this is default and does not limit the number of occurrences at all.
- Repeat n times: the appointment is scheduled exactly n times. After that it ends (but is not removed).
- Repeat until date: you can select the last date when this event happens. Note that it still happens normally during this date.
- Weekdays (Advanced)
Default is that all days are checked, which means that the event happens normally every day. By removing any check, you prevent the appointment to happen on that day. In other words, your appointment only happens on checked weekdays. The most natural usage of this is to use it with Frequency = Daily. You may want to have a chat meeting for example each Monday and Wednesday. You can do this by selecting Frequency = Daily and by checking only Weekdays Mon and Wed.
Selecting Weekly or Monthly actually causes the same thing. Deselecting any weekday for weekly or monthly or yearly repeating appointments causes all the remaining weekdays to become selected even though the original repeating selection only selects one day from the period. This is needed so that it is possible to schedule for example a meeting to happen every second week on Tuesday and Friday (Frequency = weekly, Interval = 2, Weekdays = Tue and Fri).
- Which day (Advanced)
This setting can only be used for monthly and yearly repeating events. It can be used to select which weekday from the month or year is selected. For example if you want to schedule your meeting to happen on the first Tuesday of every month, you can first select Frequency = Monthly and then check only Tuesday from Weekdays and finally set this "which day" number to be 1 (choose the number located below Tuesday). Negative numbers count backwards starting from the end of period and zero means that this setting is not used. Frequency = Yearly, weekdays = Thursday only clicked and which say = -2 means second last Thursday of the year.
- Exceptions
Here is list of exception times. - sign at the end of the row means exclusion where the appointment does not happen even though it was included in the repeat set. + sign means it is extra time to do the appointment.
You can remove the exception by double clicking it in the listing window. You can add new exception by first selecting the type (either excluded or included times) and then double clicking a day in one of the calendars below.
(Note that even though excluded time should be date, it can be shown as time in some systems. This is a way to workaround a bug where some calendar backend systems are not able to handle full date exclusions properly.)
- Action dates
Three small helper calendars, which show when the appointment will happen next. They show real time data, which is not stored in the system until you press save button.
The exchange data window is used to control physical files of orage.
It is possible to import files having calendar data or just use those
files as they are (foreign). It is also possible to export appointments
from orage to operating system files and change the names of orage data
files.

- Import
Enter the name of the file which you want to copy into
orage. You can do several files in a row by separating names with comma. After you have the file name in place, press Save andoragereads the contents in. After the file has been imported, those appointmenst are part oforageand can't be differentiated or put back into the file.You can also import foreign files from the operating system using command line. This feature can be used to import ical files directly from the web by telling the browser (like firefox) that the action is to start
orage- Export
Enter the name of the file where you want
orageto write appointments. You can choose either all appoinments or just a list of ids. Pressing save causes the appointments to be read and written to the external file. (The appointments are are not deleted fromoragebut are kept in it also.)- Archive
You can either revert all archived appointments back to the main
oragefile or force archiving. It is good idea to revert archive if you do exports since export does not look data from archive file.

- Orage files
It is possible to relocate and rename both active
oragefile and the passive archive file. Pressing save does the actual action. There are 3 options for these actions:-
Rename: the safest choice. It only updates the file name in
orageinternal structures. It does not touch operating system files at all. The new file has to exist before this operation can be done. First copy the file in you operating system and then you can change the name. - Copy: another safe choice. File is copied first into the new place followed by the internal rename described above.
- Move: File is moved first into the new place followed by the internal rename described above. Note that the original file does not exist in the original place anymore after this change.
-
Rename: the safest choice. It only updates the file name in

- Foreign files
oragecan include and maintain other than its main data file. It is possible to add (and remove) so called foreign files. They behave similarly than base data file, but they remain isolated, so that it is easy to move them back to the original system where they came from. This is mainly meant to be used when you need to maintain your calendar also in other thanorage. Sometimes it is good idea to mark the file as read only, which prevents you from modifying any of the appointments in the corresponding file. (Orage uses some private ical components, which are not necessarily understood by the other system, so updates may cause problems for the other tool.)You can also add foreign files from the operating system using command line: orage --add-foreign file
The preferences window is used to enter initial values for orage.
You can define for example several display options, how old appointments
should be archived and what is the command to be used for playing
sound alarms and also you can set the local timezone for orage.

- Timezone
You should always set the default timezone for
orage. It is possible to use also floating times, but then all times should be in floating form. It is a bad idea to mix floating and timezone times. Floating times tend to move to follow any timezones they see...- Archive threshold
oragedoes not delete appointments automatically, so usually your calendar file grows bigger and because of thatoragegets slower and takes up more memory from the system. Enabling automatic archiving causes old appointments to be moved from the active calendar file to passive history file after the selected time. This helps to keep the active file smaller and the application in good shape. Archiving is enabled by setting the threshold to other than 0 value. Of course it is also possible to manually delete appointments, but that removes them permanently and you will not be able to find them later.Note that
oragealso splits recurring appointments so that if the original start date is older than threshold, that appointment is added to the archive file and the starting date in the active calendar file is updated to contain only values more recent than the threshold. This also saves time whenorageis searching recurrent events.- Sound command
Here you can define which sound command
orageuses when playing sound files. Try testing some common commands like play or aplay from terminal to see what works in your system. You probably do not want to use full version of totem or mplayer since they will cause a video window also to appear and that most probably is not what you want.Basically it is possible to do other than sound commands also since
oragereally only starts this program and gives it the sound file as parameter. But this is not the intention of this feature.

In this tab you can define visibility options for the
main window of orage.
- Show borders
You can hide window borders and make the calendar window smaller by unselecting this option. This frees more space to your other applications from your workspace.
- Show menu
By unselecting this you can leave out the menubar in the top of the calendar window.
- Show month and year
Select whether you want to see month and year controls in the main calendar window.
- Show day names
Controls day names visibility on top of the calendar window.
- Show week numbers
Controls visibility of week numbers on left of calendar.
- Show todo list
You can hide TODO list in the main calendar by deselecting this.
- Number of days to show in event window
You can hide EVENT list in the main calendar by setting this to zero. Non zero values means the number of days to show events for.
- Set sticked
Show calendar window on all workspaces by selecting this.
- Set on top
Keep calendar window on top of all other windows.
- Show in taskbar
Controls if calendar is visible in the taskbar.
- Show in pager
Controls if calendar is visible in the pager.
- Show in systray
Controls if calendar is visible in the systray. A small icon is presented in the systray if this is selected. It is recommended that you enable this feature. By clicking this icon
orageis toggled visible or hidden. If you do not haveoragein the systray, you have two other options to make the main calendar window visible: You can either click Orage-clock panel plugin or you can startorageagain.- Calendar start
It is possible to define that
oragestarts in the background or as minimized. This option only affects the start oforage.

- Select always today
Controls which day is selected after
oragemain calendar window is hidden and comes visible again (for example by clicking orageclock panel plugin). Default value is off, which means that previously selected day will remain selected. Crossing this causes current date instead being selected.- Use dynamic tray icon
Setting this causes
orageto use dynamic icon in taskbar (if you have taskbar and you have selected to use taskbar in the Display tab). Note that this icon is used also other places where icon is used. Dynamic icon includes real month day number and also shows weekday in the top and month name at the bottom. (orageuses appreviations if real names are too long to fit to the available space.) You can revert back to old static icon by deselecting this.- Main Calendar double click shows
You can define to start either the event list (=appointment list) or the day view window when you double click day numbers in the main calendar window.
- Eventlist window
Define how many days to show in the event list when it starts. (It is possible to change the number in the event list window.)
Some hidden options allow you to customize orage behaviour. You can find
and change those in ~/.config/orage/oragerc.
You must be carefull not to change the format of this file or orage may
not start anymore. All the other settings are in the same file.
Undocumented settings are:
-
Main Window Position (Main window X, Main window Y)
and Size (Main window size X, Main window size Y): normally you do
not want to change these. It is the location and size of
calendar window
in the screen.
orageupdates this automatically, so your setting will be overwritten. -
Event Window Position (Eventlist window pos X, Eventlist window pos Y)
and Size(Eventlist window X, Eventlist window X): normally you do
not want to change these. It is the location and size of
event list window
in the screen.
orageupdates this automatically, so your setting will be overwritten. -
Logging level: normally you do not want to change this. It can be used
to control how much information
orageprints to the screen or log file ~/.xsession-errors. Message number are:-
negative= Debug (Note that special debug code needs to be linked
into
oragebefore these message are in use) - 0-99 = Message (startup and update modification messages for example)
- 100-199 = Warning
- 200-299 = Critical warning
-
300- = Error (these cause
orageto abort)
-
negative= Debug (Note that special debug code needs to be linked
into
-
Ical week start day: Defines what is the first day of week in libical.
Note, that it is only used in weekly repeating
appointments. It will not change the
calendar view anyway.
oragetries is best to find this setting automatically, but if your weekly repeating appointments seem to be wrong, you can try to set this. 0 = Monday, 1 = Tuesday... - Priority list limit: Day view listing only shows appointments, which have priority smaller than this limit. It is adviced to keep it as a high value or you will not see all your appointments in the day view window.
Some common questions and answers.
1. Frequently Asked Questions
- 1.1. Why does my week start on Saturday?
- 1.2. How can I insert my ical file into orage?
- 1.3. How can skip my repeating appointment from happening during some period of time?
- 1.4. I have found a bug in orage or would like to see a new feature. How can I inform that to the developers?
- 1.5. I upgraded to Orage 4.6 or 4.8 from Orage 4.4 and now my old appointments are missing. Are they permanently lost?
- 1.6. Does orage support group schedules?
1.1.
Why does my week start on Saturday?
This really is a problem in your distro. You can check how your
operating system reports these to GTK+ and hence to orage, which
uses strictly gtk calendar widget and does not tune these settings
itself. Command locale first_weekday shows
which day is the first day in your system. Usually Sunday is day
number 1, but that can be changed so check that with command
locale day, which shows days starting from day
number 1. You may try with different LANG enevironment variable
settings and calendar view in orage should change accordingly. Log
a new bug for orage if you think it is not working correctly.
Look more information from
Xfce bug 1237
or from
Debian bug 215466
If you are adventurous, you can actually fix these yourself. You need to find your locale definition file (like fi_FI or fr_FR). locate is your friend here and helps finding it. After that you can check what the setting is: grep first_weekday fi_FI and change that if it is wrong and after that you need to recompile your locale database.
1.2.
How can I insert my ical file into orage?
You can do this with so called foreig files. Add your file as
a foreign file and orage will use it. Or you can import the file
and orage includes the appointmemts (After this you can not tell
the difference anymore, so you can not easily move them back to
where they came form.)
1.3.
How can skip my repeating appointment from happening during some period of time?
This is common requirement. You may for example have work related
meetings happening every week and when you are on holiday you would
not like to get alarmed by those nor would you like to see those.
The iCal standard uses term "Exception Dates" for this kind of
feature, but unfortunately orage does not include that feature.
The easiest way probably is to end those appointment with end date
and then after the holiday remove the end date again.
orage has excluded date feature, so you can exclude full days, but
only one day at a time. orage still does not support excluded periods.
1.4.
I have found a bug in orage or would like to see a new feature. How
can I inform that to the developers?
You should file a bug into
Xfce bugzilla
or send an email to
<xfce4-dev@xfce.org> Xfce development. Please, remember
to include your full orage version (preferable the results from
orage -v or look the version from the about
window).
1.5.
I upgraded to Orage 4.6 or 4.8 from Orage 4.4 and now my old appointments are missing. Are they permanently lost?
Since version 4.6 orage uses different default location for
appointments than the previous version. And there is no automatic
upgrade partly because it is safer to leave the old data as it is
in case you need revert back. orage 4.6 appointments are not
compatible with older orage. You can however copy your old file to
the new place or export its contents. You can do that either manually
from operating system (make sure orage is not running) or using the
interface menus.
Old default location (in 4.4) is
~/.config/xfce4/orage/orage.ics
and new location (after 4.6) is
~/.local/share/orage/orage.ics
1.6.
Does orage support group schedules?
No. Not yet at least.